DIY Studio Lighting

Studio lighting doesn’t have to be complicated. Here is a solution that I built from scratch, based on the idea of “continuous lights”. It lacks the power of strobes but makes up for that with style and intuitiveness. It is readily understood by anyone who has operated a lamp. The design is based on Alex Campagna’s DIY Spiderlight Strobe project, which is a clone of the Westcott Spiderlight TD5 system. I made design compromises that simplify this to the bare minimum.

If you decide to build this yourself: note that you are working with AC mains voltage, easily enough to kill you, and the wiring here is a far cry from being UL approved. I make no recommendations and instead encourage you to seek a second opinion regarding the electrical work. Tread carefully, I am not responsible for harm or damage that may result from building such a system.

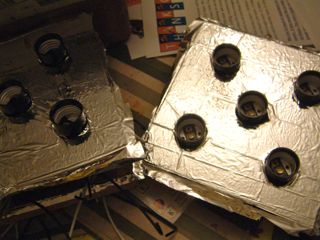
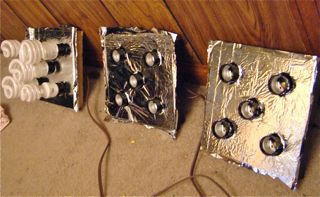
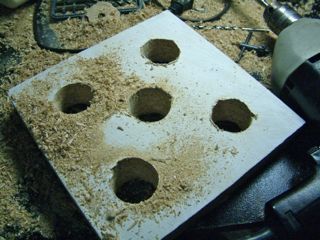
Step 1 is to get some wood squares. I cut up an old shelf into six 8″x8″ squares, then glued pairs together to make a 1.5″ thick block to work with. Sand the tops, then slap a layer of flat white primer on it. Let dry and, using a 1-3/8″ drill bit, put five holes through each. The distance between these holes is up to you – figure out what bulb diameter you’ll shoot for and space appropriately to make sure they will fit.

Now for the secret weapon – Mylar. According to various pot-growing forums (who strangely seem to be the only people on the Internet interested in doing this kind of research), flat white paint provides some 95% reflectivity of visible light while Mylar gets up to 98%. It’s way better than a glass mirror, and also beats the heck out of crumpled tinfoil. The material I used is cut from a Wal-mart Emergency Camping Blanket, $2.97 for a large sheet. It’s thin which is why I painted the back white in the first place: to reflect any stray light that may transmit through. Affix with craft adhesive, wait to dry, and punch out the holes.

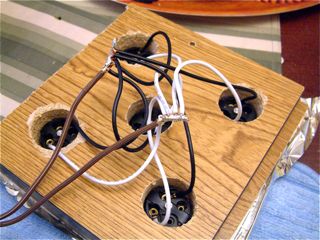
Insert the lamp sockets (Phenolic, roughly $1.50 each off Amazon), cut the ends off some 12 foot extension cables, and solder the wires. All the white leads go to one cable wire, all the black leads go to the other. Wrap in three tons of electrical tape to keep these securely insulated away from anything dangerous. I bolted some old plastic lids over the backing to at least give the impression that I cared about safety…

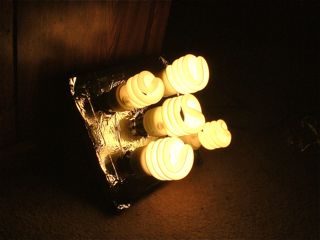
Put in some bulbs and make sure they all light up when plugged in! I’m just using some assorted “warm” CFL spares from the garage. Soon, I plan to buy several 27W EcoSmart daylight bulbs from Home Depot at about $2.50/bulb. For those interested, I did a detailed cost analysis on different bulb wattage as needed to “max out” a given 15 amp 120v circuit. This particular design does not have a lot of space between the holes and so probably can’t accomodate five high-wattage bulbs, but I may be able to squeeze in 4 on the edges and a smaller wattage in the center. CFL Studio Cost Analysis

Indeed the entire project is cheap, assuming you have the tools on hand: extension cords at $3 each, lamp sockets $1.50, bulbs $2.50 and a mylar sheet for $3 totals up to just $72 pre-tax, and the rest was just scraps and leftovers from the garage. Compare that to $225 for a single B400 strobe.

Later I’ll probably add permanent light stands, and some kind of umbrella or other diffuser. Real TD5s have switches to control the amount of light output, but I figure I can just as easily control the lights by unscrewing a few bulbs that I want off. CFLs are a great advancement over the old hot “work lights” setup and not much more expensive… 5x27W gives roughly 500W incandescent equivalent, yet after 15 minutes of running the Mylar backing remained cool to the touch.

New Webserver

From FreecycleJust a quick post here before my latest projects all escape me.  I snagged a used PC off Freecycle a couple of weeks back and swapped out my web server – reformatting and installing the latest FreeBSD at the same time, then reinstalling all the ports from scratch.

In fact my needs have simplified considerably since standing up the old server, as I’m now using a TomatoUSB-flashed WRT54GS as my router / gateway instead of the webserver box – meaning I no longer needed dhcpd, natd, an elaborate pf.conf, dyndns client, a second NIC, etc.

Interesting specs: 2.0ghz Celeron (old machine 1.3ghz Pentium4), 384MB SDRAM (old: 128mb RDRAM).  Gigabit ethernet card.  Two SATA ports.  On-board GFX using 16mb shared ram (could put in a PCI card to get that back, if I really need it)  Most everything is up and running as before – a few side projects have dependencies I haven’t reinstalled yet.  In fact the biggest challenge was updating the BIOS, because all my floppy disks are dying… I managed to do it using two half-damaged disks, one for the flasher and one for the ROM, and even then command.com didn’t want to boot so I needed to use the flasher as the interpreter : )

The old machine is going to be fitted into the gutted Galaxian cabinet and run dedicated MAME – win98se stripped, off a CF card.

Joule Thief

So I had a few problems I needed to solve:

* My 4 year old daughter loves flashlights, but often forgets to turn them off, and all of our flashlights use D cells or multiple AAs.

* We have a large (20+) collection of “mostly dead” batteries that I feel kind of bad just tossing or recycling

Both these problems are nicely solved by the Joule Thief circuit (http://www.emanator.demon.co.uk/bigclive/joule.htm) – an LED driver that can drain the very last bit of power from a battery and still function for days on end.  It has an additional advantage of only using a few parts, and I happened to have them all on hand… a rarity for me!

I have no idea what the “ferrite” material is.  I stole this massive coil out of a broken car stereo, cracked open the plastic and found that it was actually some sort of tightly wound metal tape.  So I put the plastic back on since it was prone to damage otherwise and just ran a bunch of untwisted cat5e wires around it.  Works great.  The transistor is NPN… I assume the values of pretty much everything here really don’t matter much.  I did have problems getting the lights until I realized I had connected the wrong end of one transformer lead to the battery: the two coils must oppose one another, not run in the same direction.

Of course a bare circuit is fun but not all that useful.  So I stuffed it in a little elephant toy I got off Freecycle and gave him a shiny trunk.  For now the battery is soldered straight to the leads.  One day I’ll get a real AA battery holder and some velcro to finish this up.  In the meantime he’s a good nighttime buddy for my 4 year old daughter.

Dumping C64 Tapes

Cleaning out the garage to set up my photo studio and I ran across boxes of Commodore 64 gear given to me by a friend for my birthday a couple years ago.  Among the items: some crusty old cassette tapes with data on them.  Back in the day, disk drives were expensive luxury items for saving your data (and the disks were costly too).  The cheaper alternative: a “datasette” – a specialized tape recorder that can save and load to standard and widely available audio tapes.  There were some quirks to working with tapes: they are extremely slow, must be manually positioned at the right point, and like all magnetic media the tapes “should be” carefully stored.

Fortunately retrocomputing hobbyists have since worked out long-term digital storage solutions for the analog data on the tape of various 8-bit computers.  On Commodore machines this is the TAP file – a digital representation of the various pulse lengths detected on a tape.  It can be replayed in an emulator, or turned back into a pristine WAV file to be used in a real machine (record it back to a new tape, etc).

Now, the ‘preferred’ way to dump a tape is to use a special cable to link the C64 to your PC, but I only have three tapes here and there’s no way I would go to the effort of that.  Instead I settled on the super cheap method: hook a standard tape deck to the line in of the computer sound card, record the WAV, then use a tool to make a TAP file out of it.  Not a very good solution for people with a lot of tapes to dump, because the resulting file needs a lot of manual cleaning to work properly afterwards.  The tool suite I used to fix it all up were:

  • Audacity to record the wave.  Use 96khz sample rate if your hardware supports it.
  • UberCassette (or an alternative, e.g. AudioTap) to turn a wave into a .tap file
  • tapclean to clean up, standardize, repair and verify the tap image
  • a hex editor to do a good bit of manual cleanup
  • A good reference on the tap file format!

End result of all this: I managed to fully dump the three tapes that I own.  One is “Dungeons of Death” for the VIC-20, a previously unreleased RPG.  Another is “Touch Typing Tutor” for C64: a .prg file existed, but no tape dump or scans.  And the last… a tape with programs that my friend had written back in 1985 or so.  Now that I’ve gotten the hang of this, I’m out of material!  So there’s an open request out for C64 tapes.  If you’ve got them, I may be able to dump them.

Time-Lapse Photography

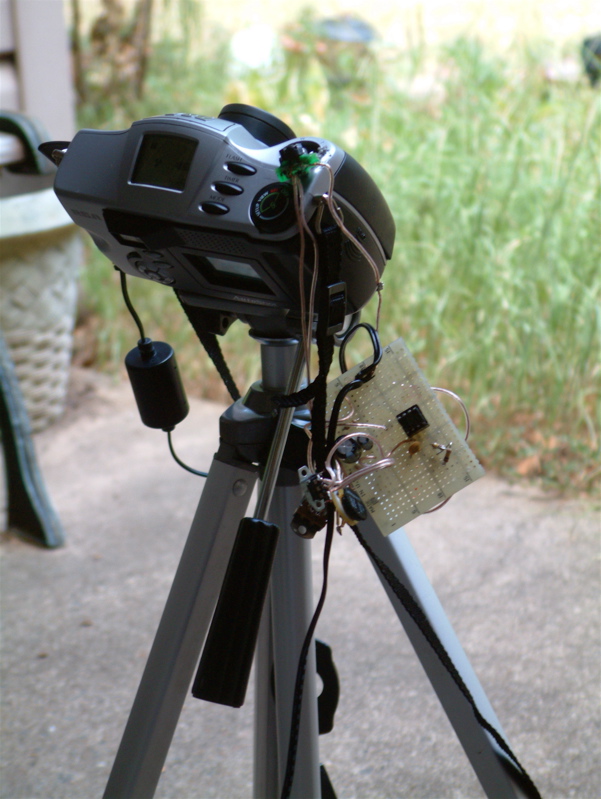
Intervalometer attached to camera, on a tripod, pointing at the sky

I’ve recently taken an interest in time-lapse photography. It’s a fun and easy aspect of photography to get involved with, and it has the potential to produce some interesting results. Plus, you don’t need a high-end camera to produce quality video: it only takes 1.6 megapixels (1440 x 1080) to assemble an HD-quality output file, which is available nowadays on many phone cameras.

I had a spare digital camera from 2001 handy: the RCA CDS6300, a 2.3 megapixel camera which is a real piece of junk. Mine has a broken battery door. On the plus side, it came with an AC adapter. So I built an intervalometer based on a 555 timer from a guide on Instructables. In the process of hacking the camera to attach the timer, I broke most of the inputs, so that it can now only be used to take time-lapse photos. It shoots 650+ images to a 256mb CF card as JPEG images, and then a bit of free software can be used to assemble these into a “motion JPEG” AVI video file (and add soundtrack if desired).

Despite the fragile build quality of the intervalometer, the mostly non-functional camera, and low quality still images – the resulting video still looks great. Here are a couple of sample videos.

A short time-lapse of clouds overhead, viewed from our front steps
Ice cube melting in a shallow bowl, one photo every 5 seconds.
Cantrell Airfield in Conway, AR visible in the distance and clouds rolling overhead