Studio lighting doesn’t have to be complicated. Here is a solution that I built from scratch, based on the idea of “continuous lights”. It lacks the power of strobes but makes up for that with style and intuitiveness. It is readily understood by anyone who has operated a lamp. The design is based on Alex Campagna’s DIY Spiderlight Strobe project, which is a clone of the Westcott Spiderlight TD5 system. I made design compromises that simplify this to the bare minimum.
If you decide to build this yourself: note that you are working with AC mains voltage, easily enough to kill you, and the wiring here is a far cry from being UL approved. I make no recommendations and instead encourage you to seek a second opinion regarding the electrical work. Tread carefully, I am not responsible for harm or damage that may result from building such a system.
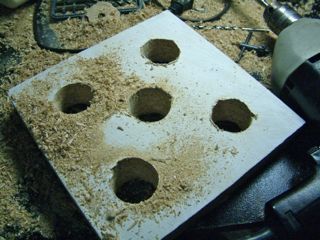
Step 1 is to get some wood squares. I cut up an old shelf into six 8″x8″ squares, then glued pairs together to make a 1.5″ thick block to work with. Sand the tops, then slap a layer of flat white primer on it. Let dry and, using a 1-3/8″ drill bit, put five holes through each. The distance between these holes is up to you – figure out what bulb diameter you’ll shoot for and space appropriately to make sure they will fit.
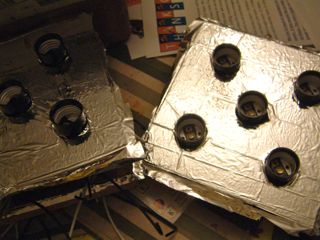
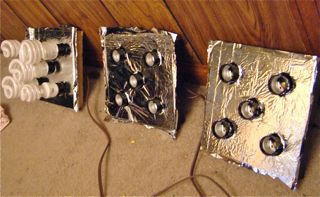
Now for the secret weapon – Mylar. According to various pot-growing forums (who strangely seem to be the only people on the Internet interested in doing this kind of research), flat white paint provides some 95% reflectivity of visible light while Mylar gets up to 98%. It’s way better than a glass mirror, and also beats the heck out of crumpled tinfoil. The material I used is cut from a Wal-mart Emergency Camping Blanket, $2.97 for a large sheet. It’s thin which is why I painted the back white in the first place: to reflect any stray light that may transmit through. Affix with craft adhesive, wait to dry, and punch out the holes.
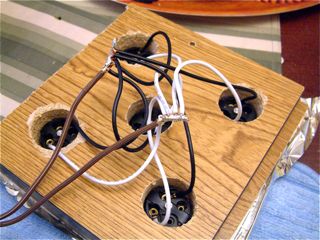
Insert the lamp sockets (Phenolic, roughly $1.50 each off Amazon), cut the ends off some 12 foot extension cables, and solder the wires. All the white leads go to one cable wire, all the black leads go to the other. Wrap in three tons of electrical tape to keep these securely insulated away from anything dangerous. I bolted some old plastic lids over the backing to at least give the impression that I cared about safety…
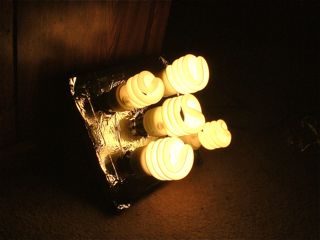
Put in some bulbs and make sure they all light up when plugged in! I’m just using some assorted “warm” CFL spares from the garage. Soon, I plan to buy several 27W EcoSmart daylight bulbs from Home Depot at about $2.50/bulb. For those interested, I did a detailed cost analysis on different bulb wattage as needed to “max out” a given 15 amp 120v circuit. This particular design does not have a lot of space between the holes and so probably can’t accomodate five high-wattage bulbs, but I may be able to squeeze in 4 on the edges and a smaller wattage in the center. CFL Studio Cost Analysis
Indeed the entire project is cheap, assuming you have the tools on hand: extension cords at $3 each, lamp sockets $1.50, bulbs $2.50 and a mylar sheet for $3 totals up to just $72 pre-tax, and the rest was just scraps and leftovers from the garage. Compare that to $225 for a single B400 strobe.
Later I’ll probably add permanent light stands, and some kind of umbrella or other diffuser. Real TD5s have switches to control the amount of light output, but I figure I can just as easily control the lights by unscrewing a few bulbs that I want off. CFLs are a great advancement over the old hot “work lights” setup and not much more expensive… 5x27W gives roughly 500W incandescent equivalent, yet after 15 minutes of running the Mylar backing remained cool to the touch.