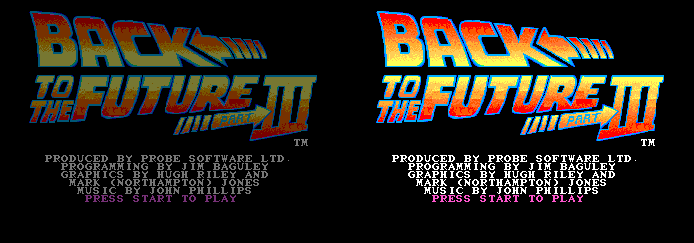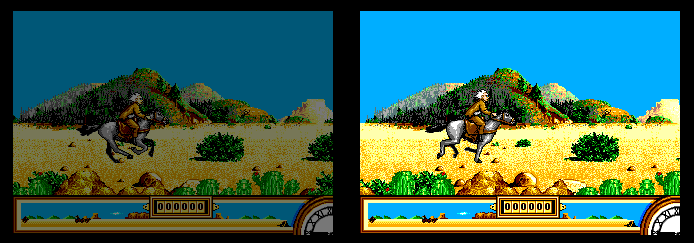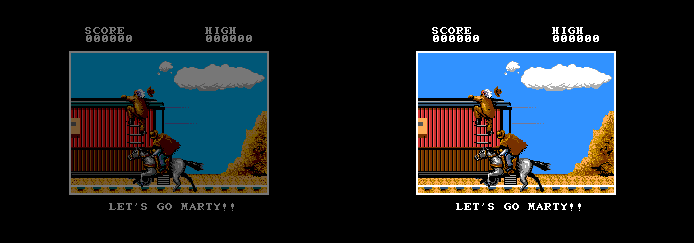
An exchange on Twitter led me into a trap that consumed a week of my time – the Sega Genesis / Mega Drive version of Back to the Future: Part III shipped with a bug that caused completely wrong colors to display. Evidently the programmer(s) were confused about the proper format of color data on the Genesis. While color values should be stored in two bytes as 0000bbb0 ggg0rrr0, this game instead uses the incorrect format 00000bbb 0ggg0rrr – all values shifted right by one bit. The end result is that the game displays at half brightness, and lower contrast.
I naively assumed this would be a simple fix: in fact, some prior discussion pointed out that color tables are stored plainly in the file, and even provided addresses to fix some of them. Of course, things are never as easy as they seem. Using a hex editor I changed some color palettes, then used the BlastEm emulator (its debugger is okay) to test, and made two discoveries:
- the list in the forum post is incomplete, and I needed to do further digging to uncover the rest of the palettes, and
- even with the palettes fixed, colors still didn’t display correctly. Any code that sets the palette (e.g. when fading to/from black) still used the old, wrong format. So while the data was correct, it still displayed wrong.
At this point I decided to see how Ghidra would fare on 68000 code. With the help from some scripts from zznop (to parse Genesis ROM headers, and to generate a new checksum after modification), I spent a couple days working at a disassembly of the ROM. Ghidra works well for this, but it has some quirks: it does not properly handle 24-bit addresses, it sometimes needs a kick with the “disassemble” key to force it to parse a block of obvious code, and the “address table” checkbox on Auto-Analysis causes far more pain than benefit – don’t use that!

In the end I produced a disassembly that was quite revealing. The game doesn’t have a lot of code re-use, it was apparently written in isolated stages and then combined together at the end. Functions for palette fades and “cutscene” display are duplicated in each segment. Finding palette setting code wasn’t too difficult once a palette were found, and usually looked something like this (taken from a “Fade To Palette” routine):
...
                         LAB_0000a264
    0000a264 3c 11           move.w     (A1),D6w
    0000a266 02 46 0f 00     andi.w     #0x700,D6w
    0000a26a 36 12           move.w     (A2)=>targetPalette64,D3w
    0000a26c 02 43 0f 00     andi.w     #0x700,D3w
    0000a270 b6 46           cmp.w      D6w,D3w
    0000a272 64 00 00 06     bcc.w      LAB_0000a27a
    0000a276 06 43 01 00     addi.w     #0x100,D3w
                         LAB_0000a27a
    0000a27a 3c 11           move.w     (A1),D6w
    0000a27c 02 46 00 f0     andi.w     #0x70,D6w
    0000a280 38 12           move.w     (A2)=>targetPalette64,D4w
    0000a282 02 44 00 f0     andi.w     #0x70,D4w
    0000a286 b8 46           cmp.w      D6w,D4w
    0000a288 64 00 00 06     bcc.w      LAB_0000a290
    0000a28c 06 44 00 10     addi.w     #0x10,D4w
                         LAB_0000a290
    0000a290 3c 11           move.w     (A1),D6w
    0000a292 02 46 00 0f     andi.w     #0x7,D6w
    0000a296 3a 12           move.w     (A2)=>targetPalette64,D5w
    0000a298 02 45 00 0f     andi.w     #0x7,D5w
    0000a29c ba 46           cmp.w      D6w,D5w
    0000a29e 64 00 00 04     bcc.w      LAB_0000a2a4
    0000a2a2 52 45           addq.w     #0x1,D5w
                         LAB_0000a2a4
    0000a2a4 86 44           or.w       D4w,D3w
    0000a2a6 86 45           or.w       D5w,D3w
    0000a2a8 3c 19           move.w     (A1)+,D6w
    0000a2aa 02 46 0f ff     andi.w     #0x777,D6w
    0000a2ae bc 43           cmp.w      D3w,D6w
    0000a2b0 66 00 00 04     bne.w      LAB_0000a2b6
    0000a2b4 52 41           addq.w     #0x1,D1w
                         LAB_0000a2b6
    0000a2b6 33 c3 00        move.w     D3w,(VDP_DATA).l
             c0 00 00
...
A bit hard to see maybe, but the important parts are that it’s processing the values in B, G, R order, by using “(component) and 0111“, and incrementing if less than the desired value. This is the wrong bitmask. Changing to 1111 (i.e. 0x7 to 0xf) allows fading through the full gamut, and everything now displays as intended. I was also able to reference the SEGA logo (at game boot), which DOES have proper colors, to double-check that I had this implemented correctly.
Finding the other places in the code where this happens is pretty trivial. A search for 0x0777 or andi.w 0x07 reveals the rest. With that fixed, I regenerated the checksum and wrote a new ROM, then used LunarIPS to make an IPS patch for distributing the fix.
The last step was to port the changes to the EU version of the game. Fortunately, the data is the same, and a Perl script with find-replace made locating the offsets easy. A new IPS patch, a README file, and we’re ready to ship.
Download the patch:
All told, this was actually a fun rabbit hole to get lost in, and I did pick up a lot about Ghidra and 68000 assembly that I had been wanting to learn anyway. If only it didn’t come right in the middle of NaNoGenMo… 🙂


This is excellent, thank you. 🙂
If you ever feel like tinkering with a SNES game, Eek the Cat on that system has this exact same problem.
http://i.imgur.com/KPabuwL.png
Amazing. Nobody’s fixed this one, either, at least that I can see… Maybe I’ll take a look once November is over.
It also occurred to me that these changes may create timing differences that throw off TAS videos. I’ll have to try it with http://tasvideos.org/2534M.html and see if there’s need for a 1.1 version.
Pingback: Top peores juegos de SEGA Mega Drive según MobyGames – Puesto 6