Author Archives: admin

Writing a WebSocket Client in Perl 5

WebSockets are the latest way to provide bi-directional data transfer for HTTP applications. They replace outdated workarounds like AJAX, repeated polling, Comet, etc. WebSockets are a special protocol atop HTTP (which in itself runs over TCP/IP), and can be wrapped in SSL for security (as in HTTPS). Being a Web Technology, it seems to have been developed by the JavaScript people exclusively for the JavaScript people – working with it outside a web browser or Node.js server can seem convoluted. But that’s the world they built, and we just we live in it.

Basic Perl support / documentation for WebSockets was difficult for me to find. The Mojolicious framework (specifically the UserAgent module) has native WebSockets support and can act as a client, but I was looking for info on using with WebSockets on a lower level / without Mojo or other frameworks. Hopefully, this post can shed some light on how you can use Perl to connect to a remote server using WebSockets, and get access to those sweet real-time services using our favorite language.

First off, if you can, you should just use AnyEvent::WebSocket::Client or Net::Async::WebSocket::Client (depending on your preference of async framework). This package has already done the hard work of combining the two packages you’d probably use anyway, Protocol::WebSocket::Client (for encoding / decoding WebSocket frames), and AnyEvent (for cross-platform non-blocking I/O and doing all the messy TCP socket stuff for you). Having already established my status as a Luddite a desire to know what’s really going on, let’s try to reinvent the wheel and write our own client.

A Client for the Echo Test Service

The goal of this project is to interoperate with the WebSocket Echo Server at ws://echo.websocket.org. The Echo Server simply listens to any messages sent to it, and returns the same message to the caller. This is enough to build a simple client that we can then customize for other services. There are two things we need to make this work:

  • a plain Internet Socket, for managing the TCP connection to the remote server, and
  • a Protocol handler, for encoding / decoding data in the WebSocket format.

The second part of this is already done for us by Protocol::WebSocket::Client: given a stream of bytes, it can identify WebSocket frames and parse them into data from the server, and it can take data from our program and encapsulate it for sending. This tripped me up at first, so pay attention: Protocol::WebSocket does NOT actually do anything with the TCP socket itself – meaning it does not send or receive any data on its own! The class is responsible for only these things: packing/unpacking data, generating a properly formatted handshake for initiating a WebSocket connection, and sending a “close” message to the server signalling intent to disconnect.

Given that Protocol::WebSocket::Client doesn’t do any TCP socket stuff itself, we have to manage all that. Fortunately, there’s the core module IO::Socket::INET which we can use. Protocol::WebSocket::Client also provides some hooks for points in the WebSocket flow, so that we can insert our own handlers at those points. Let’s get started with some code.

Continue reading

Info Page – @FPAdventuresBot

MYST Book – screenshot from Myst (PC, 1993)

@FPAdventuresBot is a Twitter account that regularly posts screenshots from first-person, point-and-click adventure games. Images are randomly selected from a pool, pre-extracted from original game data files. The bot source code is available on GitHub:

https://github.com/greg-kennedy/FPAdventuresBot

It uses Twitter::API to manage file uploads and posting to Twitter. For some games, I have written custom tools to extract images. Source code for these is in the tools/ subdirectory. There are also some audit scripts in the main folder to find duplicate images or solid-color images. These use Image::PNG::Libpng for working with PNG images.

The account currently posts images from the following games:

Continue reading

Secret of Evermore (Bugfixed)

Secret of Evermore is a game for the Super Nintendo released in 1995. It continues to be a somewhat controversial title in the otherwise spotless Squaresoft SNES library… but I like it, and my wife plays it as a “comfort game” whenever she is feeling sick.

IPS is an antiquated binary patch file format, used to provide a “diff” of raw bytes that should be applied over an existing file. IPS patches for SNES games are widespread, and often do things like enable cheats, alter graphics, translate text, etc. In some cases, people have found bugs or glitches in the original code, and release an IPS patch to fix it. Often these are found from the work of speedrunners, who spot a glitch and exploit it to break the game in some way. The SNES hackers then identify the code problem behind the bug, and patch the raw binary code to close the hole. There’s a whole black art to crafting binary bugfixes – the space for a fix is severely limited, and if the new code is too big you have to find additional unused code area elsewhere to jump into (or optimize a different routine to make some free space!)

For some games, more than one bugfix patch is available. Managing these with the ubiquitous LunarIPS tool is a pain – you have to generate a bunch of intermediate ROMs, and the patches may conflict / overwrite one another without indication of the problem. There are better IPS patchers around, but I didn’t want to go on a research quest to find one. Besides, IPS is a pretty simple format – why not just write my own patcher?

I wanted a way to take a binary file, apply a complete “patch set” to it, and return the resulting bin. I wanted it to check for conflicts in patches, and give a descriptive message of which exact patches were colliding. And then I didn’t want to just serve up a cooked file, for copyright and maintainability reasons. “XYZ (Bugfixed)” hacks are too frequently outdated, as new patches are released. So I put a simple PHP frontend before it and a folder full of patches server-side.

The tool is here: https://greg-kennedy.com/SecretOfEvermore/

Users can upload a file. If the SHA-1 matches, it gets patched and they download the fixed version. This tool is for Secret of Evermore, with all the patches (i.e. “hard work”) done by Assassin17.

I may stand up sites for other games as I run across them, or merge these into a single “bugfixer” tool if it gets too out of control.

The patch.pl script follows.
Continue reading

Downloading from Soundcloud

A couple years ago, downloading a song from Soundcloud used to be pretty trivial. Their server would send you the complete 128kbps MP3, and then the local embedded control would allow you to seek at will. Because the file arrived in one large chunk, it was both easy to identify in cache, and easy to copy somewhere else to play back. Sometimes this still works… You’ll know by looking at the dev console, and see if it shows a huge MP3 file transfer. If so, you’re in luck! Copy it from the cache and you’re set.

Evidently they’ve changed this practice for other tunes, possibly to improve the latency of seeking at random in tracks, or possibly because they don’t want people getting music they shouldn’t be able to get. You can get Greasemonkey scripts which put the download button back, but these simply fire the URL off to an third-party site which “somehow” reconstructs the song and then sends it back your way. Very black-box magic stuff indeed.

However – If you can stream it, you can download it, as they say. Let’s take a look at how Soundcloud actually gets a song to you, and see if we can still figure out how to download something we may not really be allowed to.

Start the browser’s Developer Console and then browse to a song you want to hear. Keep an eye on the “network” activity, it will give you clues as to what is actually going on. As the song begins playing, you’ll see a lot of small network requests to magically named files:
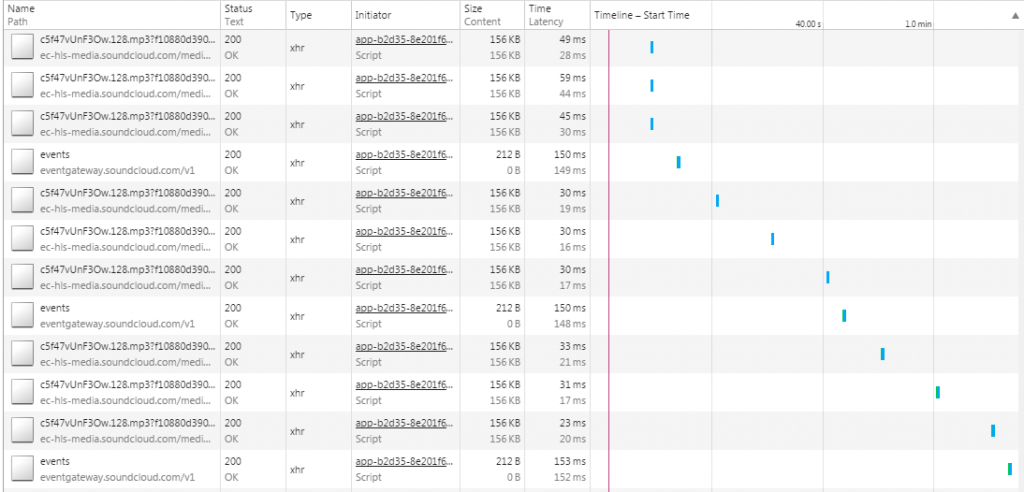
mini_files

This seems promising. Download one or two and run “file” on it, and you get:
$ file *
c5f47vUnF3Ow.128.mp3?f10880d39085a94a0418a7e163b03d5226edfe2317e6aa1445547d76cf23a7ca5b08b0b9169eed2c0a13f681ab93c51d8e788dcaa887622ee2905d7463e4fd982e918b5b687caf75047026a3429731c5010a16: MPEG ADTS, layer III, v1, 128 kbps, 44.1 kHz, JntStereo
c5f47vUnF3Ow.128.mp3?f10880d39085a94a0418a7e167b03d5249919aaf544816306c9a5e3ca05a129454accfdda2750c51705ac2f68f036a37b2c482058312ab10625db87a6e3ab6dc1d1631dbd883a3f38786db484e66359daf667314eb8f03: MPEG ADTS, layer III, v1, 128 kbps, 44.1 kHz, JntStereo

Okay, so Soundcloud has broken the file into parts and is playing them back in sequence. You can pop one of these into your media player and listen to a portion of the song. We’re close, but how do we know where to find all these parts and put them together in order? Easy: there’s an m3u8 that has that for you – check the Dev Console again! Soundcloud’s player is using this to fetch the data in order from various URLs, and then stream it to you. For example, something like this:

#EXTM3U
#EXT-X-VERSION:3
#EXT-X-PLAYLIST-TYPE:VOD
#EXT-X-TARGETDURATION:10
#EXT-X-MEDIA-SEQUENCE:1
#EXTINF:1.985272,
https://ec-hls-media.soundcloud.com/media/0/31762/c5f47vUnF3Ow.128.mp3?f10880d39085a94a0418a7e163b03d5226edfe2317e6aa1445547d76cf23a6c6277ac4a31c0a01842ddc2964536e126c07aa07555cce1108baa06b42a8a56548b485330689f4477467fbe84e3701184db02ae8
#EXTINF:2.977908,
https://ec-hls-media.soundcloud.com/media/31763/79410/c5f47vUnF3Ow.128.mp3?f10880d39085a94a0418a7e167b03d5249919aaf544816306c9a5e3ca05a13988480bef0d85fac22fe42482ceefe72b45f93798b344c894177b5503fecfe001728ea53a521df650649905f1f820170622633f8408d974a
#EXTINF:4.989302,
https://ec-hls-media.soundcloud.com/media/79411/159240//c5f47vUnF3Ow.128.mp3?f10880d39085a94a0418a7e168b03d52f1af9dc5c031765e833721190ff39af5838b01fab4994aa8e1cbf7325eac7c17bbc32c9af8a4f995094f28154eaf2285d51dae2371e29d5df21535551f28bc9d3d6cdf11c7f30fd3
#EXTINF:9.978604,
https://ec-hls-media.soundcloud.com/media/159241/318900/c5f47vUnF3Ow.128.mp3?f10880d39085a94a0418a7e169b03d52a8b3c33b59894223455854e2f950e750c62859d445307c2908ba5ad3f2b1c73b802a1616248b94bd6c5babf25058d658ad1566709910633c2cd63c67371fbb6692e6db87e986a283f0
...
#EXTINF:9.978604,
https://ec-hls-media.soundcloud.com/media/3352449/3512109/c5f47vUnF3Ow.128.mp3?f10880d39085a94a0418a7e061b03d52eb7d518bdc510e28891131df942c66df2d11c65c5f6f65b400607098a9a36cb891691d16355d126d2ecbc6451bb48f82561d15b81d006b4104caff07fffa8361c42652b9341faefa8f4513
#EXTINF:5.642352,
https://ec-hls-media.soundcloud.com/media/3512110/3602388/c5f47vUnF3Ow.128.mp3?f10880d39085a94a0418a7e061b03d52eb7d518bdc510e28891131df942c66df2d11c65c5f6f65b400607098a9a36cb891691d16355d126d28cfc6401ebd8f8214c9a4dd73e90391e79897cc892a72bcd4883580fdef67b3cf0e33
#EXT-X-ENDLIST

An interesting aside, it seems these URLs time out after a short period of time, leading to 403 Forbidden errors if you try to access it again. No doubt these huge URL parameters point to some browser session or timestamp which becomes invalid after a while. If that happens, reload the page and start playing again to generate new files.

So to recap all this: we need to

  • take the m3u8 file,
  • retrieve each mp3 segment,
  • and concatenate them together.

Getting the m3u8 programmatically is hard, so just copy it from the browser : ) And to put these together you’ll need mp3cat installed – see http://tomclegg.ca/mp3cat for info.

#!/usr/bin/env perl
open(FP,"playlist.m3u8") or die "can't open playlist: $!";

my $piece = 0;
while( < FP > )
{
chomp;
next if ($_ =~ m/^#/);
$filename = sprintf('outdir/%02s.mp3',$piece);
print `wget --no-check-certificate -O $filename $_`;
$piece++;
}

print `cat outdir/*.mp3 | mp3cat - - > output.mp3`;

Arduino Raytracer

Every programmer worth his salt has written a raytracer of some sort. It’s one of the classic “recursion exercises”, with a fair amount of math to wrap your head around. I’m not interested in writing one to run on the PC – there are already far more capable ones that can run on pretty much any hardware, complete with optimizations and features I couldn’t hope to implement in my lifetime.

Instead, I decided to write a raytracer which targets the Atmega 328 microcontroller in my Arduino! In the end, I succeeded in banging one together that calculates ray-triangle intersection, and each triangle can have a material attached with ambient / diffuse / transparent / reflective values and an RGB color. The scene is compiled in with a .h file (stored in PROGMEM), and outputs a PPM image pixel-by-pixel over the serial port.

The same engine can be used on the PC with a few modifications, so I was able to benchmark the performance of the Arduino in comparison with a modern laptop. The “detailed scene” rendered a 640×640 image in 263 seconds on the laptop. The same scene, scaled to only 64×64, still took 4008.471 seconds… in other words, the PC outperformed the Arduino by a factor of ~1500.

I posted the code, and further write-up, on the Arduino.cc message board at this link: http://forum.arduino.cc/index.php?topic=281076.0. There are a lot of features that COULD be added here, but none that I actually intend to do. If I need a raytracer in the future, I’m just downloading POVRay : )